So you want to create a CFWheels application? ( Part 2 )
This CFWheels series is heavily borrowed from Dan Wilson 's "So You Want to" series about Model Glue :Unity. This entry matches to this post . We have installed CFWheels and talked about the files, Request Handling and URL Rewriting . If you setup URL Rewriting , you will be accessing our Contacts...Published on
This CFWheels series is heavily borrowed from Dan Wilson's "So You Want to" series about Model Glue:Unity. This entry matches to this post. We have installed CFWheels and talked about the files, Request Handling and URL Rewriting. If you setup URL Rewriting, you will be accessing our Contacts application a little differently then if you have partial URL rewriting or no URL rewriting. I'll show all three URLs.
View
First, lets create a folder under views called contact, then inside it create index.cfm. Place this code in index.cfm
<cfoutput>
<html>
<head>
<title>Contact-O-Matic</title>
<link rel="stylesheet" type="text/css" href="/stylesheets/menu.css" media="screen" />
</head>
<body>
<div>
<div id="banner">Contact-O-Matic</div>
<div>
<div>
<h2>This is index.cfm from contact folder</h2>
</div>
</div>
<div id="footer">
 #dateformat( now(), "long")# #timeformat( now(), "long")#
</div>
</div>
</body>
</html>
</cfoutput>URL Rewriting On = http://localhost/contact
URL Rewriting Partial = http://localhost/index.cfm/contact
URL Rewriting Off = http://localhost/index.cfm?controller=contact&action=index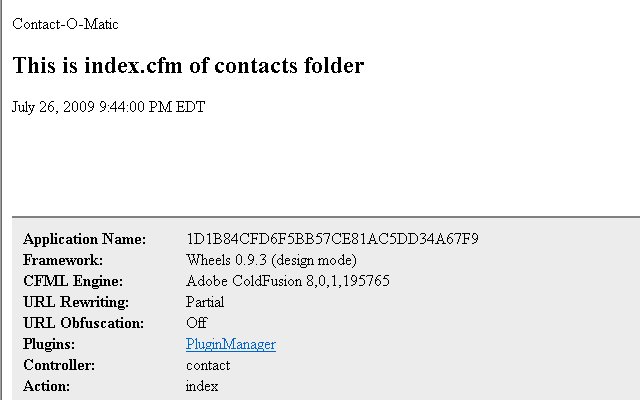 At the bottom section of the browser, you can see some specific CFWheels debugging information. Notice the controller is contact and the action is index.
Controller and Action
Let's add the controller and action. Create a contact.cfc file in the Controller folder with this code.
<cfcomponent extends="Controller">
<cffunction name="index">
<cfdump var="#params#">
<cfabort>
</cffunction>
</cfcomponent>customerid=1URL Rewriting On = http://localhost/contact?contactid=1URL Rewriting Partial = http://localhost/index.cfm/contact?contactid=1URL Rewriting Off = http://localhost/index.cfm?controller=contact&action=index&contactid=1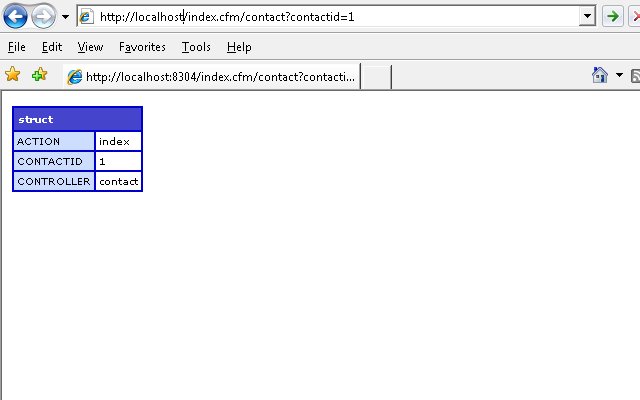 Remove the dump and abort from the index action in the contact controller. Place the following two lines of code in the action.
 <cfset contacttype = "No Contact Type Defined" />
<cfset ContactTypes = "There are no contact types defined either" />View again
Then in the views folder, replace
<h2>This is index.cfm from contact folder</h2><strong>Controller:</strong> #params.Controller#<br /><strong>Action:</strong> #params.Action#<br /><strong>ContactID:</strong> #params.ContactID#<br /><strong>ContactType:</strong> #variables.ContactType#<br /><strong>ContactTypes:</strong>#variables.ContactTypes#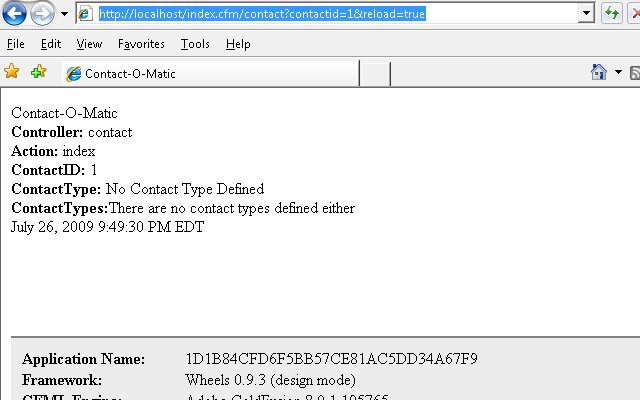 Notice, the ContactType and ContactTypes variable we set in the controller are available in the variables scope of our view.
Layouts
We have covered alot, but two more things. You may have noticed our source has two html and body tags. This is because, CFWheels has a layout convention. This file is in view/layout.cfm. Let's move our common header and footer code to it. Change the default layout page so it looks like this:
<!--- Place HTML here that should be used as the default layout of your application --->
<html>
<head>
<title>Contact-O-Matic</title>
<link rel="stylesheet" type="text/css" href="/stylesheets/menu.css" media="screen" />
</head>
<body>
<div>
 <cfoutput>#contentForLayout()#</cfoutput>
<div id="footer">
<cfoutput>#dateformat( now(), "long")# #timeformat( now(), "long")# </cfoutput>
</div>
</div>
</body>
</html><cfoutput>
<div>
<div>
<strong>Controller:</strong> #params.Controller#<br />
<strong>Action:</strong> #params.Action#<br />
<strong>ContactID:</strong> #params.ContactID#<br />
<strong>ContactType:</strong> #variables.ContactType#<br />
<strong>ContactTypes:</strong>#variables.ContactTypes#<br />
</div>
</div>
</cfoutput>Partials
There much cleaner. One last thing. Lets add a menu by creating a partial. Partials are like using a cfinclude but more powerful within CFWheels. Create a file in the views/contact folder called _banner.cfm . The underline is a convention for signifying a partial file. Put this code in the _banner.cfm file:
<div id="banner">
 Contact-O-Matic
 <ul id="navlist">
 <li><a href="#" <cfif params.action IS "index">id="current"</cfif>>Home</a></li>
 <li><a href="#" <cfif params.action IS "contactList">id="current"</cfif>>Contact List</a></li>
 <li><a href="#" <cfif params.action IS "contact">id="current"</cfif>>Contact</a></li>
 </ul>
</div>#includePartial("banner")#StyleSheet
Add a menu.css file using the css from listamatic into the stylesheets folder. And Voila. You should have something like this now. 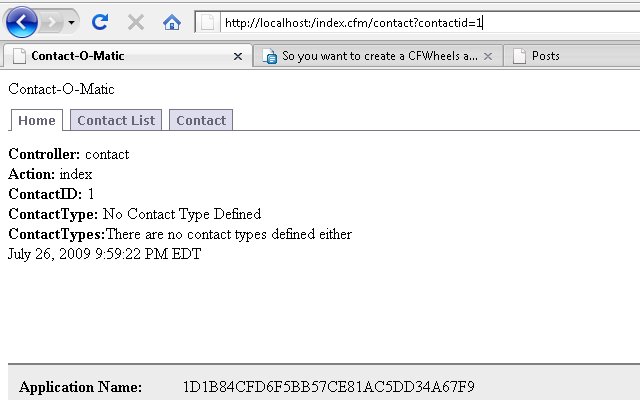 In the next part of our series, we will add and save contacts with a contact form.